I don't usually just write a blog post without something to share but I just can't seem to stop thinking about jobs. Its that time of year again here in New Brunswick where the job postings come out. I have been out of university for 6 years and I have yet to land a contract! I am going crazy here. I moved to New Brunswick last year and I have just been supplying ever since. In Nova Scotia, I had finally knew a lot of people, had a few long term jobs and had a path to follow. Then my boyfriend decided he wanted to be closer to family, which is fantastic, but I get to start at the bottom again. I have applied two years in a row for this list that you need to get on to get a long term contract and still haven't been accepted. I have TONS of experience, a passion to teach and I just don't know what else to do.
I had an interview the other day for a totally different job and once I left I could not stop thinking about it. Is this really what I want? Teaching is my dream job, can I just give up on it that easily? I spent the entire weekend thinking about leaving the field and then woke up this morning knowing that teaching is where I want to be. I want to have a job teaching kids in my own classroom. I've never wanted anything more.
So where to go from here? I have no idea. I can't do a lot other than apply for the "list" and hope for an interview. Here is to another year of waiting for that job to come up. I've been told "good things come to those who wait." Well I've been waiting for a long darn time so I sure hope there is a job in my future!
To all those other supply teachers who are in the same boat, you're not alone. It sure feels like it on a daily basis when you wake up and have no job to go to but you're not alone and don't forget that. Our time has got to come eventually, until then we keep our heads up and teach our hearts out on the days we actually get to be in the classroom :)
Monday, May 9, 2016

Wednesday, January 13, 2016
Lego, who doesn't love Lego?
 Hello there! What child do you know that doesn't love playing with Lego? I have no children but I'd be happy having some Lego around my house to play with! So much fun and so many possibilities for things to make! I've been doing a lot of helping out with an after school program and the kids are Lego obsessed! I whipped up this game for the kids to play with Lego Blocks and they love it!
Go download it and play with your kids! :)
Wednesday, December 2, 2015
Hello December - Elf Ideas
I'm so sad not to have my own classroom this year - I miss having so much fun with Tinsel! I was going to put him up around our house but I just don't think my boyfriend will buy into the idea - haha!
Tinsel has had some fun over the past three years in the classroom :) I thought I'd share some pictures from over the years for a few ideas - and a calendar for this year! I always find it easier to plan ahead, I don't like leaving this to the last minute, maybe it's the teacher in me :) One less thing to think about every day after school!
Always try to bring your Elf to activities throughout December. A teacher friend of mine told me about one year all the classrooms at her school had an elf and they all showed up on the stage at the Christmas Concert! How freaking cute is that! The kids love that he/she moves around and does fun things so why not let the join in all the December fun!


Tuesday, September 8, 2015
Author Study - Kevin Henkes
Kevin Henkes is one of my favourite children authors! I love all his books and my class always grows to love them as well! I choose to do an author study on Kevin Henkes and there were so many ideas out there in the Pinterest world and teacherspayteachers.
My class really loved using the Smartboard so I decided to make a game for the kids to play after we'd read some Kevin Henkes books. The game is a form of Jeopardy and the kids loved it!
The books included in this game are:


Also, after reading the book Chrysanthemum, I had drew a picture of her and had the students give me some character traits they noticed about Chrysanthemum.

My class really loved using the Smartboard so I decided to make a game for the kids to play after we'd read some Kevin Henkes books. The game is a form of Jeopardy and the kids loved it!


Now go get some Kevin Henkes books and start your author study! :)
Saturday, April 25, 2015
Recycled Art
Who doesn't love making something crafty and recycling at the same time?
I have been working at a daycare since I recently moved and we don't have a large amount of funds given for activities so we like to used recycled materials for projects. The parents are a great help in this as they will save and bring in almost anything we ask.
I was searching on pinterest one day for some ideas to make with bottles (my boyfriend drinks a lot of apple juice!) and it hit me, something to make for the kiddos to actually use at home - a piggy bank! Kids can learn the value of saving money after making a fun craft!
First I had parents save and bring in empty apple juice bottles. You could use any bottle really but I made sure the spout was large enough to empty the coins out of when needed.
I washed out all the bottles and I cut a slit in the side with a sharp knife before I handed the bottles to the kids for painting.
The first step was to paint the entire bottle - I chose to paint mine pink but some children chose black. I did three coats of paint on mine but they did not have that much patience so some did one coat and others did two.
Once the bottles dried (the next day), I used a hot glue gun to add googly eyes, ears and feet. I had first decided to use tops of milk jars as the feet but I to collect all of those would take a little too much time so I bought a package of buttons at the dollarstore!
I put on the feet to keep the bank from rolling back and forth.
Here are my four feet - pink buttons but feel free to use anything you can think of :)
And here is his super cute face!
Some piggy's that the children made! They were pretty excited to take these home :)
The one thing I didn't think of which I wish I did was to add a pink pipe cleaner on the back as a curly tail!
Saturday, January 10, 2015
Shrinky Dinks
If you haven't heard of Shrinky Dinks, you must check them out! I have made them many times and so many people would come in to buy them when I worked at Michaels. A popular item with kids for sure!
I wasn't sure what type of art project to make with the kids I was substituting for the week before Christmas break. I knew they loved art and I thought an ornament would be an awesome way to make a memorable art project.
I went to Michaels to buy a pack of Shrinky Dinks - I got lucky, there were 20 kids in the class so I bought the pack of 10 sheets and each child got a half sheet :) I also made a template of a round ornament and a large rectangle (bookmark). I photocopied the template and had the students tape the shrinky dink to the template in order to have the same sizes.
They designed and coloured their two shapes, placed their name or initials somewhere and then cut them out. I then punched a hole in each one for the string later :) And into the oven they went!
Here's a few before the oven
And here they are after! Did the ever shrink!
They turned out so darn cute! The kids LOVED them!
Wednesday, December 10, 2014
Elf on the Shelf - Classroom Style
Last year while teaching grade 2 - we had the pleasure of having Tinsel visit our classroom on December 1! Tinsel was delivered to the classroom and the box was cold (I had left the box in the freezer in the staff room). The kids were so intrigued by the idea of the box being addressed to us from Santa!
Tinsel was awesome - he did some great things and wished the students well on as many opportunities as he could. He did have to return to the North Pole once as one child had touched him but they soon learned how he worked and no one touched him again.
It was an awesome management strategy so close to the holiday break. The students were so concerned as to what Tinsel was sharing with Santa that they were trying their hardest to be on their best behaviour.
So this year I am subbing in my old class right before Christmas break! And I just have to have Tinsel make an appearance! I found this new Elf on the Shelf cookie sheet and I HAD to buy it!
Now, I've never baked in a cavity pan before so lets just say the first batch was not a winner! I made the sugar cookie recipe on the back of the package. I had an idea that the dough would spread a little so I did not fill the cavities enough the first time. I learned that lesson quick!
After making a batch of royal icing and dying all the colors - they turned out AWESOME! They were a lot of work but I am so happy with the end result! The kids are going to flip - I plan on putting a little note from Tinsel, wishing them a Happy Holidays!
And now to wish you all a HAPPY HOLIDAYS from me to you!
Sunday, November 9, 2014
Technology What?
Technology is one of my favourite units to teach in Social Studies. It cracks me up when I tell the kids I never had a cell phone or the internet when I was a kid - they just can't even imagine!
I filled in for a maternity leave and the teacher had some great stuff in her technology box - an old walkman, some old computer printer paper with the little holes that you rip off, an old game boy. They loved seeing all these old things so I've been trying to start my own collection to have.
One activity we did was talk about how cars have evolved since the horse and buggy. Then we chatted about what they would want as a special feature on a car. I had an activity where they could invent their own car and give it a special feature. First they got to build the car from lego (that class had a lot of lego), then draw the car and write about their special feature. Afterwards, we shared our cars and what was so special about them.
Sunday, November 2, 2014
How Many Seeds in Your Pumpkin?
Again, I got to sub in my old class and the teacher was flexible so I asked if I could do this awesome pumpkin activity with the kids that I "stole" from my friend Nicole (THANK YOU).
So first thing was I went to a local farm and picked up 4 different sized/shaped pumpkins. I decided I would have 4 groups of 5 doing the activity.
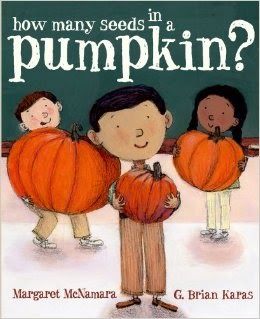
Before we started we read this book:


So first thing was I went to a local farm and picked up 4 different sized/shaped pumpkins. I decided I would have 4 groups of 5 doing the activity.
Before we started we read this book:
It was awesome - it talks about how the students can estimate and count the seeds in their pumpkins.
I then had a baggie with 20 pumpkin seeds as an example of what 20 seeds looked like for estimating purposes.
I created an observation sheet for the students to fill out before and after the activity. Before we got started sorting and counting seeds they had to put their estimate on their sheet.
I also made a chart for the class and recorded all estimates before we dug into the guts!
*I had the students count the lines/grooves on the pumpkin as I heard a rumor that the more lines on the pumpkin, the more seeds would be inside. In our case the rumor was not true*
The kids had a GREAT time digging into the pumpkin guys and sorting out all the seeds. I had a bowl for them to throw them all into and afterwards we cleaned up all the guts. Depending on the group, they decided how they would sort their seeds to count (most groups choose to do groups of 10). After we were done counting, I gathered all the seeds and planned on washing and roasting the seeds for a treat but ran out of time :( BUT... I did leave a nice note to the teacher and said she could do it if she'd like :)
Here are a few shots of the sorting and counting :
Our four odd shaped and sized pumpkins
Getting dirty!
Emptying our pumpkins!
The baskets are getting full with seeds
Time to count - groups of 10's for this group!
Frankenstein & Adjectives
I love working on adjectives! The kids can always come up with some awesome and creative words that I sometimes don't think about. I subbed in my old class the other day and I knew we touched on adjectives last year so this would be an activity they would love for Halloween and it would get them writing.


I gave them each a piece of black paper for the background and a half a piece of green construction paper and then I just put scraps on the table of other colours (I always keep scraps of construction paper - you never know when you might need small pieces). I also provided a half a piece of white paper with lines for their writing. First they glued on the white piece of a paper to one side and on the other side they built their Frankenstein's, using all their creativity!
Here's my example
After the had their Frankenstein made, I allowed them to name him/her whatever they'd like and describe their features. We did an example for mine on the board together.
Here are a few of their creations:
Tuesday, October 14, 2014
Classroom Organizer
I have too many books to keep track of and I love buying books but the problem was I'd be in the store and wonder if I already owned a copy of a book I was about to purchase. I found the BEST app to keep all my books organized.
I have downloaded the app called "Classroom Organizer" and it rocks! The app has a scanning feature so you can scan the barcode and it puts the book into your database. If the book does not have a barcode, you are able to put in the ISBN # and still add the book to your database. It's so awesome! You can also organize your books into different categories and you could use it for your classroom library and have the students sign on and sign out books so you always know where your books are. You can check out the website at :
 Here's what the picture for the app looks like - now go download it because it rocks!
I have downloaded the app called "Classroom Organizer" and it rocks! The app has a scanning feature so you can scan the barcode and it puts the book into your database. If the book does not have a barcode, you are able to put in the ISBN # and still add the book to your database. It's so awesome! You can also organize your books into different categories and you could use it for your classroom library and have the students sign on and sign out books so you always know where your books are. You can check out the website at :
Read Aloud Organization
I had a few sub days this past week but I had to stay with my parents as they were a far drive from my apartment and my parents basement is my storage place for all my school related stuff :)
I took some time to sort through my books and stole an idea from a friend (Thanks Nicole)! I organized some of my favourite read aloud and teacher only books. I started out organizing by subject or topic but I resorted back to months and then one file for each subject incase I had a few to add in that I like using in a specific subject area.


I took some time to sort through my books and stole an idea from a friend (Thanks Nicole)! I organized some of my favourite read aloud and teacher only books. I started out organizing by subject or topic but I resorted back to months and then one file for each subject incase I had a few to add in that I like using in a specific subject area.
I have each month labeled and then a label for each subject.
Not all the subjects and months are full but there's quite a selection of books that I had just thrown in a tote and now they are easily accessible and ready to go when I need them.
And now that they are sorted by subject and month I can pull one or two each month to keep in my sub bag :)
Saturday, October 4, 2014
Kadinsky Leaf Art
Here is a quick art project to keep in your sub tub, especially during fall. I was subbing in a class the other day and there was some time in the schedule so we did a little art. This takes minimal supplies (paper, black marker, and crayons or coloured pencils).

First I started with drawing an outline of a leaf with pencil, then tracing over with black marker. I told the students to decide which colour they wanted to colour the background and then try not to use that colour in their leaf, as it would pop out more. Inside the leaf, we drew circles with different colours to fill the inside.

This was my finished product, I worked as they worked (they were an AWESOME class)
Here are a few of their finished products :)


I allowed them to draw whichever shape leaf they liked and have their own take on it. They turned out awesome! I am hoping the teacher is able to display them somewhere for the fall :)
Subscribe to:
Posts (Atom)